Monday, December 30, 2013

Some of our Christmas Projects...

We started off learning a little about Hanukkah.  We made these...

 A menorah.

 And we did some menorah skills sheets.

And then we moved to Christmas and we made...

 A fingerpainted Christmas tree and glued pom poms onto it.

 A Santa by putting cotton-balls on his beard (I don't use this as a Christmas countdown) and its from
Childcareland.com.

 We did a Christmas ornament collage and decorated with shiny paper scraps.

 And we water-painted a Santa... they turned out very colorful!!!

And lastly we made the parent Christmas gifts...

We made the Santa hand print ornaments however we used model magic vs. any of the other items I saw being used for these lovely ornaments.  They turned out great and they were very light weight and easy to hang on a tree.  Below are a few pictures of how ours looked when we finished.  I only wish one of my own children were still in my program so I would have had one to hand on the tree.


Next we made the hand print snowman ornaments.  These also turned out great!


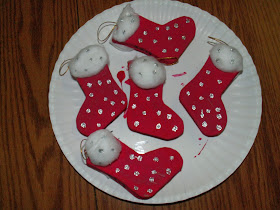
And our last project was cute stocking ornaments.  They were already made ornaments I got at the craft store that needed paint and other details to make them look great.  We used red paint, silver glitter glue and a cotton ball cut in half (one for each side).


Hope you all had a Merry Christmas!!!!

Best,
Rose

Sunday, December 8, 2013

Thanksgiving Book

Thanks to the wonderful ideas of at Musings of Me (Michelle) I created a book like her Thanksgiving Tale which you can find here.

We used the book "Thanksgiving Mice" which is a story about Mice that have a play about the first Thanksgiving to discuss the first Thanksgiving.

We then made the following pages for our Thanksgiving book.


Thanks for stopping by,
Rose

Wednesday, November 27, 2013

Native American Bead Making and Necklace Making

During the month of November we study Native Americans.  One of the projects we did was bead making. It was rather easy for us after thinking through the activity and making it as easy as possible.  And our final result would be a necklace.


First we got straw pieces and some crayola model magic.  I love that stuff and its a different texture for the children to experience.  I thought it would be easy to mold, quick to dry, and light as I knew we'd make necklaces out of them.


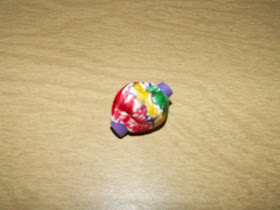
Our first step was to mold the bead.  I showed the children how to make a ball and then put the straw piece through the middle of the ball.  I had to use a sharp pencil to get any leftover dough out of the straw.  We let these dry for several days, although we didn't have to.


Our next step was to put color on the beads.  I thought about many options... paint was on the top of my list... but I wanted them colorful so I opted to use markers to color the beads.  The children loved doing this so it was a success.


Next we strung our necklaces using the beads we made, straw pieces, and some plastic beads I had.  What fun it was trying to come up with a pattern!  Even the younger children had fun with this.  I always tape one end to the table when we string and when they are done I carefully remove the tape and tie the ends together.


And we all were excited to show off our beautiful necklaces we made!

Thanks for stopping by,
Rose

Tuesday, November 26, 2013

Family Theme

Right before we get into Thanksgiving I like to do something about our families.  Besides all the books and activities we did I thought our "Family Books" turned out really nice.  Here is what we made...

We made the cover with paper piecing and some imagination of how we wanted our house to look.

Our family portraits were fun to make after talking about whose in our family and how
each family can be different.

We all talked of different things families like to do and then each child
picked their favorite that their family likes to do and illustrated it.

We talked about what they eat at home and then each child picked their favorite
food their family likes to eat.

We did a lot with how I help my family and then each child illustrated how 
they like to help their family.

And our final page was to color a heart and glue a family picture to it
that they brought from home.

Hope you enjoyed how we made our family books.
Rose

Monday, November 25, 2013

Space Theme

We spent a few days learning a little about space.  Some of the activities we did were:

We made a rocket ship which I forgot to take a picture of the final project.


We went over some space vocabulary with this from here.

We made toilet tube astronauts and got the pattern from here.

We did two concept worksheets on patterning and same size from here.


We did a number sequence puzzle of the solar system from here.

We also did a cutting activity sheet from here.

 We sequenced the size of the sun, Earth, and moon.

And we made these fun toilet paper tube space shuttles from here.

Thanks for stopping by,
Rose

Wednesday, November 20, 2013

"Itsy Bitsy Spider"

I am taking this cognition class they are offering in my area and we had homework.  Our assignment was for the children in our care to "act out" a familiar story.  Thank you to Deborah Stewart and her blog (which you can see here) it simplified what I was going to do.

I took the book "The Itsy Bitsy Spider" and decided to use it for my assignment and see how things would go.  Of course, this had to be child-driven so I really didn't have a "plan" ready of exactly how we should accomplish the task.

Before I read the book, to show the familiarity of the story, I had my preschoolers sing the song.

We decided to just do the first verse of the story which is the regular version of "The Itsy Bitsy Spider".  Once we decided on the verse we had to come up with the role each child would take and we used the marker board to list the roles and who would do each part.  The children got all the parts except the waterspout so with some prompting they figured out we needed a waterspout.

Each child needed to make a prop for their role using what ever they wanted to (can you tell do-a-dot markers are a fav around here)...

The Sun

 The Rain

 The Spider

 The Waterspout

They decided how to put the play together and the final production looked like this...

Well we had so much fun doing this that they wanted to do another one... so we picked the second verse in the book and worked it out similar to the way we did it above.  
We decided on the characters (or items) we needed using the marker board.  This time they got all of the characters, including the kitchen wall.

This time they were in such a hurry to "act it out" that they spent very little time and hardly any materials to make their prop.
The Spider

The Fan

The Wind

Interestingly enough they picked the wall where our play kitchen is to do the whole production.  They did have me sing to help them since they didn't know the verse very well.
Here is the final production...


You can view my powerpoint for the class to see more details of the assignment.

Thanks for stopping by...
Rose